CHEQ’s enriches your data by introducing new fields for Threat Type (an indicator for the reason of how CHEQ classified the request – automation tools, VPN, click hijacking, etc.), Threat Group (malicious, bot, suspicious, valid, good bots, etc.), AI Traffic Type (agent, crawler, or none), and other dimensions.
Install the CHEQ Library Tag
Collect three values from your CHEQ account click on your [Account Name] > Account Settings::
| What you need | Where it appears in the tag | Example |
| Tag domain | The host in the src attribute | po.example-domain.com |
| Tag ID | The numeric suffix in the class attribute | 52475 |
| Noscript URL | The src of the iframe in the noscript block | https://its.example-domain.com/ns/XXXX.html?ch=cheq |
Your invocation tag looks like this:
|
<script async src="https://<YOUR_TAG_DOMAIN>/i/<YOUR_TAG_HASH>.js" data-ch="cheq" class="ct_clicktrue_<YOUR_TAG_ID>"> </script> |
Pull these values from your own account. Values copied from documentation, a demo environment, or another property will not report into your workspace.
A note on placement
CHEQ is a security tag, and security tags work best when nothing can get in front of them.
Hardcoding the tag in the <head> of your page template is the strongest deployment. It guarantees CHEQ initializes before any other script on the page, and it removes the tag manager as a dependency - which matters, because traffic sophisticated enough to block your tag manager would otherwise slip past detection entirely.
Deploying through Tealium iQ is the practical choice for most teams, and it works well when you configure the timing correctly. The steps below do that. If you have the option to hardcode, take it. If you don’t, follow this guide as written.
Create the CHEQ Initiator Tag
- Go to Tags and click + Add Tag.
- Search the Tag Marketplace for Script and select it.
- Configure the tag:
| Field | Value |
| Title | CHEQ Initiator Tag |
| Base URL | https://<YOUR_TAG_DOMAIN>/i/<YOUR_TAG_HASH>.js |
Use the full src value from your invocation tag, including the path. The domain alone returns a 404.
Set the vendor configuration
Open the tag’s Vendor Configuration section:
| Setting | Value | Why |
| Query String Delimiter | ? | Standard |
| Parameter Delimiter | & | Standard |
| Key/Value Delimiter | = | Standard |
| Auto Cache Bust | Disabled | Cache busting breaks the tag URL |
| Request Script Once | Enabled | Prevents duplicate loads on single-page apps |
Request Script Once is not optional. On a single-page application, every utag.view() call re-fires the tag. Without this setting, you inject the CHEQ script repeatedly into a single page session, which inflates event volume and degrades page performance.
Set the load timing
Open Advanced Settings under Publish Settings:
| Setting | Value |
| Tag Timing | Prioritized |
| Send Flag | On |
| Synchronous Load Type | Off |
| Custom Script Source | https://<YOUR_TAG_DOMAIN> |
Then set the Load Rule to Global - All Pages.
Load rule and load timing are separate settings, and both matter. The load rule controls whether the tag fires. Tag Timing controls when. Tealium’s default fires tags at DOM Ready, which can place CHEQ after your ad pixels, chat widget, and form scripts have already run, leaving detection gaps in exactly the sessions you most want visibility into. Prioritized fires CHEQ immediately after load rule evaluation, ahead of your other tags.
Optional: earlier initialization
For the earliest execution Tealium allows, deploy the invocation script through a JavaScript Code extension scoped to Pre Loader instead of as a tag. Pre Loader runs before Tealium processes anything else, including the data layer and load rules.
Use this when you need maximum coverage on high-value conversion paths. Include the guard so the script loads only once:
|
if (!document.querySelector('.ct_clicktrue_<YOUR_TAG_ID>')) { var s = document.createElement('script'); s.async = true; s.src = 'https://<YOUR_TAG_DOMAIN>/i/<YOUR_TAG_HASH>.js'; s.setAttribute('data-ch', 'cheq'); s.className = 'ct_clicktrue_<YOUR_TAG_ID>'; document.head.appendChild(s); } |
(Optional) Deploy the noscript fallback
The noscript tag cannot be deployed through Tealium iQ. Tealium’s utag.js is JavaScript. When a visitor has JavaScript disabled, it never executes, so no tag it manages can fire - including a noscript pixel.
Add the noscript block directly to your page template, immediately after the opening <body> tag:
|
<noscript> <iframe src="https://<YOUR_NOSCRIPT_DOMAIN>/ns/XXXX.html?ch=cheq" width="0" height="0" style="display:none;visibility:hidden"> </iframe> </noscript> |
Skipping this step leaves a detection gap. Some automated traffic runs without JavaScript specifically to evade client-side detection.
Validate
Publish to a non-production environment first, then confirm all four:
- The script loads. Open your site, then DevTools → Network. Filter for your tag domain. You should see one request to /i/<YOUR_TAG_HASH>.js returning 200.
- It loads once. On a single-page app, navigate between several views and confirm the request count stays at one. More than one means Request Script Once is off.
- It fires early. In the Network waterfall, confirm the CHEQ request starts before your advertising and analytics tags.
- Events reach CHEQ. Open the CHEQ platform and confirm traffic appears for the property. Allow a few minutes for processing.
Data Layer Integration
Note: This feature is for CHEQ Analytics customers only.
The Data Layer Connector allows CHEQ Analytics users to quickly and easily plug CHEQ data into Tealium iQ.
Configure the Data Layer
In the CHEQ platform, navigate to Analytics > Settings > Data Layer. Configure the Data Layer Connector to use the data layer structure that is native to your analytics implementation, similar to what's shown below:
The Data Layer controls how classification data reaches the page. You choose the delivery method, the event name, and your own key names, and you map each key to a CHEQ value. Nothing about the naming is fixed. The key names in this guide are examples; your Tealium code has to match whatever you configure here.
Available values
The connector exposes more than these two. Add keys for others the same way:
| CHEQ value | What it is |
| Policy Threat Type / Threat Group | Classification with your account policy applied. Most reporting uses these; they match what the CHEQ platform acts on. |
| Detected Threat Type / Threat Group | The underlying detection outcome, independent of policy. |
| AI Traffic Type | agent, crawler, or none. Separates agentic sessions from indexing crawlers and human traffic. |
| Entity Vendor / Entity Name | Which AI vendor and client drove the visit. |
| Request ID | Unique ID per CHEQ library load. Useful for QA and joining data across systems. |
Create the variables in Tealium
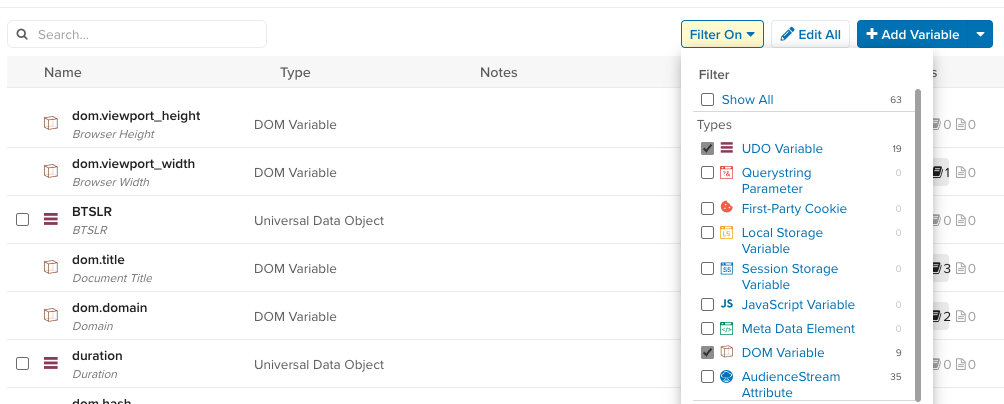
In your Tealium profile, go to Data Layer and add UDO Variable entries for each data layer variable.
Create Variables in Adobe Analytics
To see CHEQ data in Adobe Analytics, you must first create variables to store the data. Typically, we recommend storing this data as an eVar; but please leverage whatever methodology is preferred by your organization. With that said, we recommend using the following eVar configuration (you do not have to use the same eVar slots used in this example):
Variable 1
| Field | Value |
| Name (Suggested) | CHEQ Threat Group |
| Status | Enabled |
| Allocation | Most Recent (Last) |
| Expire After | Never |
| Enable Merchandising | Disabled |
Variable 2
| Field | Value |
| Name (Suggested) | CHEQ Threat Type |
| Status | Enabled |
| Allocation | Most Recent (Last) |
| Expire After | Never |
| Enable Merchandising | Disabled |
Send CHEQ data with a Supplemental Tag
To send CHEQ data to Adobe Analytics, please ensure you've first followed the implementation steps from the base tag instructions. Once you've created your UDO Variables, you're able to map the variables in the Adobe Analytics tag.
Data is most frequently sent via one of 2 Extensions in Adobe Launch: the Adobe Analytics Extension or the Web SDK Extension (both shown below).
Fire the classification event
The binding above covers every hit that fires after classification. To capture sessions where CHEQ resolves after your page view, add a second JavaScript Code extension scoped to DOM Ready that listens for the connector’s event and sends a supplemental call. The event name must match what you set in the Data Layer configuration screen:
|
document.body.addEventListener('cheq_response', function () { utag.link({ tealium_event: 'cheq_response', link_name: 'CHEQ Response', cheq_threat_type: localStorage.getItem('<YOUR_THREAT_TYPE_KEY>') || 'Unknown', cheq_threat_group: localStorage.getItem('<YOUR_THREAT_GROUP_KEY>') || 'Unknown' }); }); |
| Each supplemental call will trigger ONCE PER USER (or as long as their Local Storage persists). If their status changes (rare edge case), an additional event will trigger. |
Map the variables in the Adobe Analytics tag
Open your Adobe AppMeasurement for JS tag, go to Mapping, and map:
| Tealium variable | Adobe destination |
| cheq_threat_type | The eVar slot configured for CHEQ Threat Type |
| cheq_threat_group | The eVar slot configured for CHEQ Threat Group |
| link_name | linkName (Link Tracking category) |
Tealium sends utag.link() calls to Adobe as s.tl() custom links, so the supplemental event does not inflate page views. The link_name mapping labels it CHEQ Response in reporting.
Validate
Publish to a non-production environment and confirm the supplemental server call is firing.